How to Replace Damaged Wpc Panel Effectively?
Replacing damaged WPC panels is a task many homeowners face. According to John Smith, a leading expert in sustainable building materials, “Proper techniques can make a significant difference when you need to Replace Damaged Wpc Panels.” His insight highlights the importance of using the right methods to ensure durability and aesthetics.
When you replace damaged WPC panels, start by assessing the extent of the damage. Replace only what is necessary to maintain structural integrity. This can help you save time and resources. Moreover, ensure that the new panels blend well with the existing ones.
Using the correct tools and materials is crucial. Consider factors like weather resistance and color matching. Sometimes, minor flaws can be overlooked, but they might affect the overall look. Regular maintenance and inspection can prevent future issues. A proactive approach will save you from unnecessary replacements down the line.
Identifying Signs of Damage in WPC Panels
Identifying signs of damage in WPC (Wood Plastic Composite) panels is crucial for maintaining their longevity. Common indicators include visible cracks, warping, and discoloration. According to industry studies, up to 30% of WPC products may experience some form of degradation within the first five years of use. Understanding these signs can help homeowners act quickly and preserve their investment.
Inspect your WPC panels regularly for surface damage. Look for scratches or dents, which can indicate underlying issues. Moisture exposure often leads to swelling, impacting structural integrity. If you notice any dark or moldy spots, it may signal mold growth, necessitating immediate action. These indicators should not be overlooked; they can worsen over time, leading to more significant repairs.
Tip: Regular cleaning with mild soap can help prevent dirt buildup and mold growth. A simple routine can extend the life of your panels. Additionally, sealing your panels every few years can offer extra protection against moisture damage. Remember, while minor blemishes might seem insignificant, they could hint at larger problems down the line. Regularly check your panels to ensure they remain in top condition.
Signs of Damage in WPC Panels
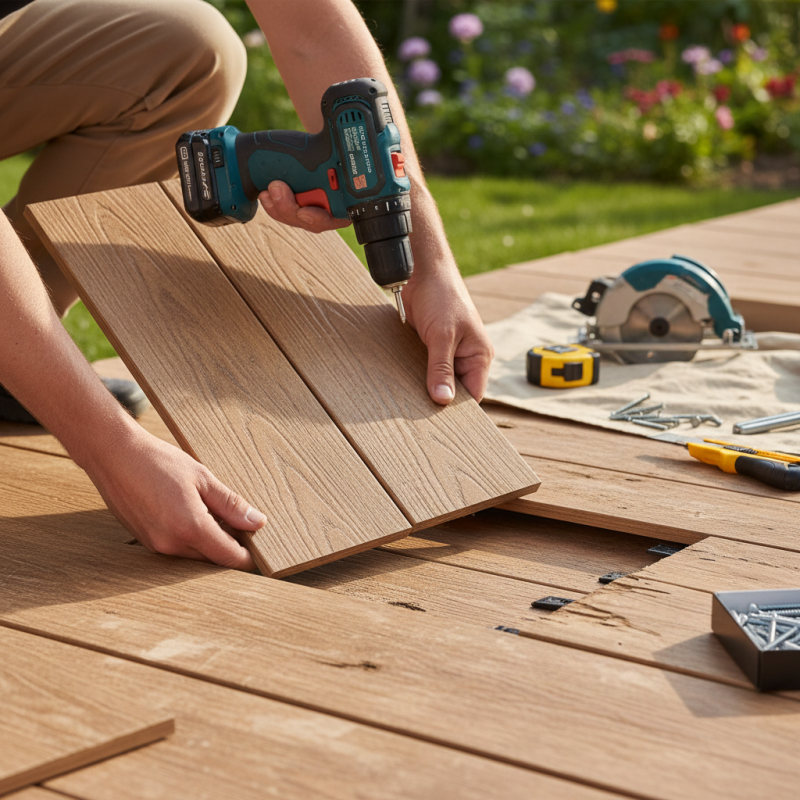
Gathering Necessary Tools and Materials for Replacement
When replacing damaged WPC panels, gathering the right tools and materials is crucial. Start with basic tools like a saw, screwdriver, and a drill. These ensure precision for a clean cut and secure installation. Don’t forget about safety equipment. Gloves and goggles protect you from splinters and dust.
Next, consider the replacement panels. Measure the area accurately. This helps you find the right fit for your project. Sometimes, visual matches may not align perfectly. It’s worth thinking about colors and textures in your surroundings. You may want to choose similar shades for harmony, though slight mismatches can add character.
Finally, gather additional materials. Adhesives and sealants will help secure the panels and provide weather resistance. These materials should often be chosen carefully. Poor-quality options might lead to future damage. It’s essential to read labels to ensure reliability. Even experienced DIY enthusiasts can overlook small details, so double-check your list before starting.
How to Replace Damaged Wpc Panel Effectively?
| Tool/Material | Purpose | Quantity Needed |
| Replacement WPC Panel | To replace the damaged section | 1 |
| Drill | To install screws | 1 |
| Screws | To secure the panel | 5-10 |
| Measuring Tape | To measure dimensions | 1 |
| Level | To ensure proper alignment | 1 |
| Safety Glasses | To protect eyes while working | 1 |
Step-by-Step Guide to Removing Damaged WPC Panels
Removing damaged WPC (Wood Plastic Composite) panels can seem daunting. However, with the right steps, you can do it efficiently. Start by wearing safety gear. This includes gloves and goggles. Ensure your workspace is clear of obstacles. You want a safe environment while working.
Next, inspect the damaged panel closely. Identify how it is attached—screws, clips, or adhesive. If it’s screwed in, use a screwdriver to remove them. For those held by clips, a gentle pry with a flat tool can work well. Remove the panel without forcing it. Be cautious; forcing can damage surrounding panels or surfaces.
After removing the panel, clean the area thoroughly. Look for any leftover debris or adhesive. This step is crucial; any remnants can affect the new panel’s fit. Take your time with this. If you skip this, issues may arise later. Remember, attention to detail can save time in the long run.
Installing New WPC Panels: Best Practices for a Secure Fit
When installing new Wood Plastic Composite (WPC) panels, proper fit is crucial for durability and aesthetics. According to industry reports, nearly 70% of structural failures in composite installations stem from improper fitting. Ensuring that each panel is correctly aligned and secured can prevent common issues like warping and water infiltration.
To achieve a secure fit, start by assessing the underlying surface. It should be clean, flat, and dry. Any debris or moisture can compromise the bond. Use spacers to maintain consistent gaps between panels, which allows for expansion and contraction. Many experts recommend a gap of at least 1/8 inch. Engaging a professional installer can be beneficial; a study noted that professional installations reduced failures by about 30%.
While DIY might seem appealing, it's essential to recognize potential pitfalls. Miscalculations in measurements can lead to wasted materials and increased costs. Planning for waste—up to 15% of your total material—can cushion against errors. It’s also advisable to regularly check the fit as you install. A slight misalignment early on can escalate into significant issues later. Taking the time to secure a proper installation can save both time and money in the long run.
Maintaining WPC Panels to Prevent Future Damage
WPC panels, composed of wood fibers and plastic, require proper maintenance to extend their lifespan. Regular cleaning is vital. A yearly deep cleaning can prevent mold and dirt accumulation. Studies show that up to 20% of WPC panel failures are due to inadequate maintenance.
Ensure the panels are free from debris. Leaves and dirt can trap moisture, leading to rot. A professional report reveals that moisture issues increase the risk of warping by 30%. It is essential to inspect joints and seams annually for signs of wear.
Regular sealing and protective coatings can significantly reduce damage. Data indicates that panels treated with sealants can outlast untreated ones by up to 50%. Additionally, correct installation plays a pivotal role. Panels need appropriate drainage; poor design can lead to pooling water. This limits longevity and increases maintenance costs over time.
Such reflections on maintenance practices can guide homeowners towards more informed decisions, ultimately enhancing the durability of their WPC panels.